Projector screens are essential to enhance the viewing experience of any projection. There are also some other alternative screens that can be used as projector screens.
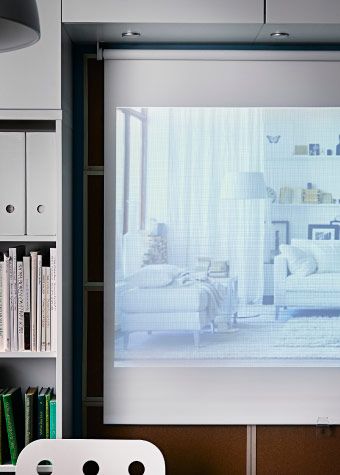
A popular choice in this category is the Tupplur projector screen. But many people are confused if it can be used as a projector screen or not.
So, should you choose tupplur projector screen?
The Tupplur projector screen can be used as a projector screen. It is a cheaper option that provides good projection quality. To use the Tupplur projector screen, you’ll need to set up the screen. First, take measurements of the Tupplur screen. Then, set up the brackets of the screen. Next, attach the rotator bracket with the stator bracket. Finally, attach the metal tab to complete the installation!
Can You Use Tupplur As a Projector Screen?
the answer is, yes! You can use Tupplur as a projector screen at your home. Using Tupplur as a projector screen will save you tons of money and it’s a quite good option too.
To use Tupplur as a projector screen, it needs to be set up. The next segment of this article consists of all the necessary steps to do so. Have a look.
How to Use Tupplur Projector Screen?
Using a Tupplur projector screen may seem tricky, but it’s quite easy. First, you have to set up the projector screen. It consists of a couple of steps. All of them are mentioned below in detail, give it a read!
Set up the Screen:
Before operating the Tupplur projector screen, you’ll have to set it up. Setting up the projector screen properly will give you the best conditions to enjoy the projector! Follow the steps-
Step 1: Take Measurements
Start off by measuring the area you’ll be setting up the Tupplur screen on. Take a pencil and mark out the edges of the stator brackets. Make sure to leave a gap of at least 5mm between the brackets and the ceiling.
Mark the area for the brackets parallelly. You can use a leveler to make sure the brackets are on the same level.
Also, measure the width of the screen. If you want a shorter screen, you can cut it! Don’t cut the screen more than 200 mm.
Step 2: Set up the Brackets
After taking the measurements, place the brackets in their designated area. Then, use a drill machine to drill the brackets in place with two screws.
After that, attach the rotator bracket to the screen. Leave at least a 5 mm gap for the rotator screen to be attached. This is applicable even if your projector’s on a popcorn ceiling.
Step 3: Attach the Rotator Bracket with the Stator Bracket
In this step, you’ll need to stick the rotator bracket with the stator bracket. The holes of both these brackets will align upon pushing the ends together. Make sure you have the bright side of the projector screen facing your side.
Step 4: Attach the Metal Tab
Now that your screen is set up, you have one last thing left. Attach the metal tab on the bottom of the projector screen. Slide the metal tab from the side of the screen to the middle of the screen. That’s it, you’re done setting up the Tupplur projector screen.
You can further fine-tune the environment for better viewing angles and quality. It’s always best to pick a dark room to set up the projector and the projector screen. The more ambient lighting you have in the room, the more you’ll lose image quality!
You also need to optimize the contrast ratio and brightness of your projector. Brightness is not always proportional to good image quality. So change the brightness till the image quality improves.
The process of modding the setting will be different for printers. For example, the contrast and brightness settings will differ in Epson 5050 and Epson 4050.
Additionally, try to keep the projector close to the projector screen and tweak the contrast according to your preference.
Advantages and Disadvantages of a Tupplur Screen
As with all the projector screens out there, Tupplur projector screens also have advantages and disadvantages. I’ve mentioned them below, check them out-
Advantages:
- It’s inexpensive. Unlike other traditional projector screens, the Tupplur projector screen is really cheap.
- It can retain a lot of brightness. The image on the Tupplur screen is bright enough to be enjoyed. Especially on the grey variant of the Tupplur projector screen.
Disadvantages:
- One of the main disadvantages of the Tupplur projector screen is that, it’s not flat around the edges. As a result, there is a slight forward flex on the projector screen.
This doesn’t allow the projection to be horizontal. Ultimately, the image can bend down a few centimeters on the bottom.
The solution to this problem is to attach something heavy on both sides of the screen. This will allow the screen to be straight due to the tension. This way you can also use the projector as a monitor!
Frequently Asked Questions (FAQs):
Which projector is good for the eyes?
Projectors that are certified for eye protection are good for the eyes. The certification is given due to the low light emission of a projector. So the lower the blue light emission, the better it is for your eyes.
Do projector screens have glare?
Yes, projector screens can have a glare. The glare is more common in traditional projection screens. As the screens rely on specular reflections, it struggles with glares and spotlight effects. This can greatly hinder one’s viewing experience.
What is projector screen material?
The screen of projectors is mainly made of fiberglass, textile, paint variants, etc. Vinyl is also used in the making of projector screens. The main objective is to reduce as much reflection as possible to improve image quality.
The Final Words
You’ve reached the end of this article. Hopefully, now you know how to use tupplur projector screen at your home!
Although the Tupplur projector screen is decent, it might not be enough for you. You can opt for better projector screens if you want a higher-quality viewing experience.
Good luck!
